深度卷积神经网络(AlexNet)
深度卷积神经网络(AlexNet)

学习数据特征的方法
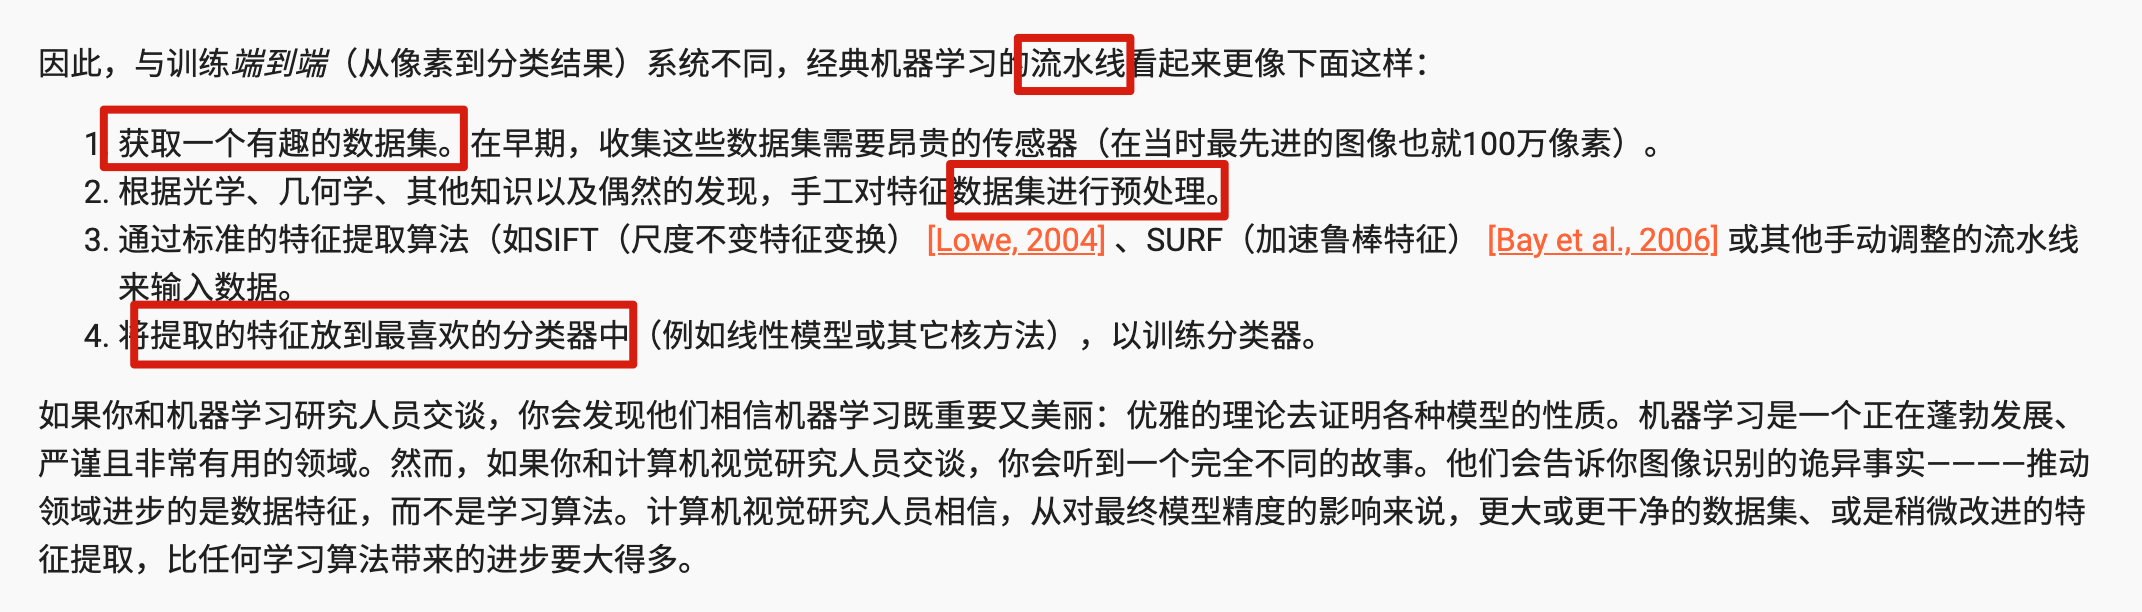
有一个领域的人的路线是:设计一套新的特征提取方法、改进结果。
而AlexNet创始人认为特征本身就值得学习,此外,他们还认为,在合理地复杂性前提下,特征应该由多个共同学习的神经网络层组成,每个层都有可学习的参数。在机器视觉中,最底层可能检测边缘、颜色和纹理。
AlexNet
AlexNet使用了8层卷积神经网络,他的架构和LeNet的架构非常相似,注意,这里我们提供了一个稍微精简版本的AlexNet,去除了当年需要两个小型GPU同时运算的设计特点。
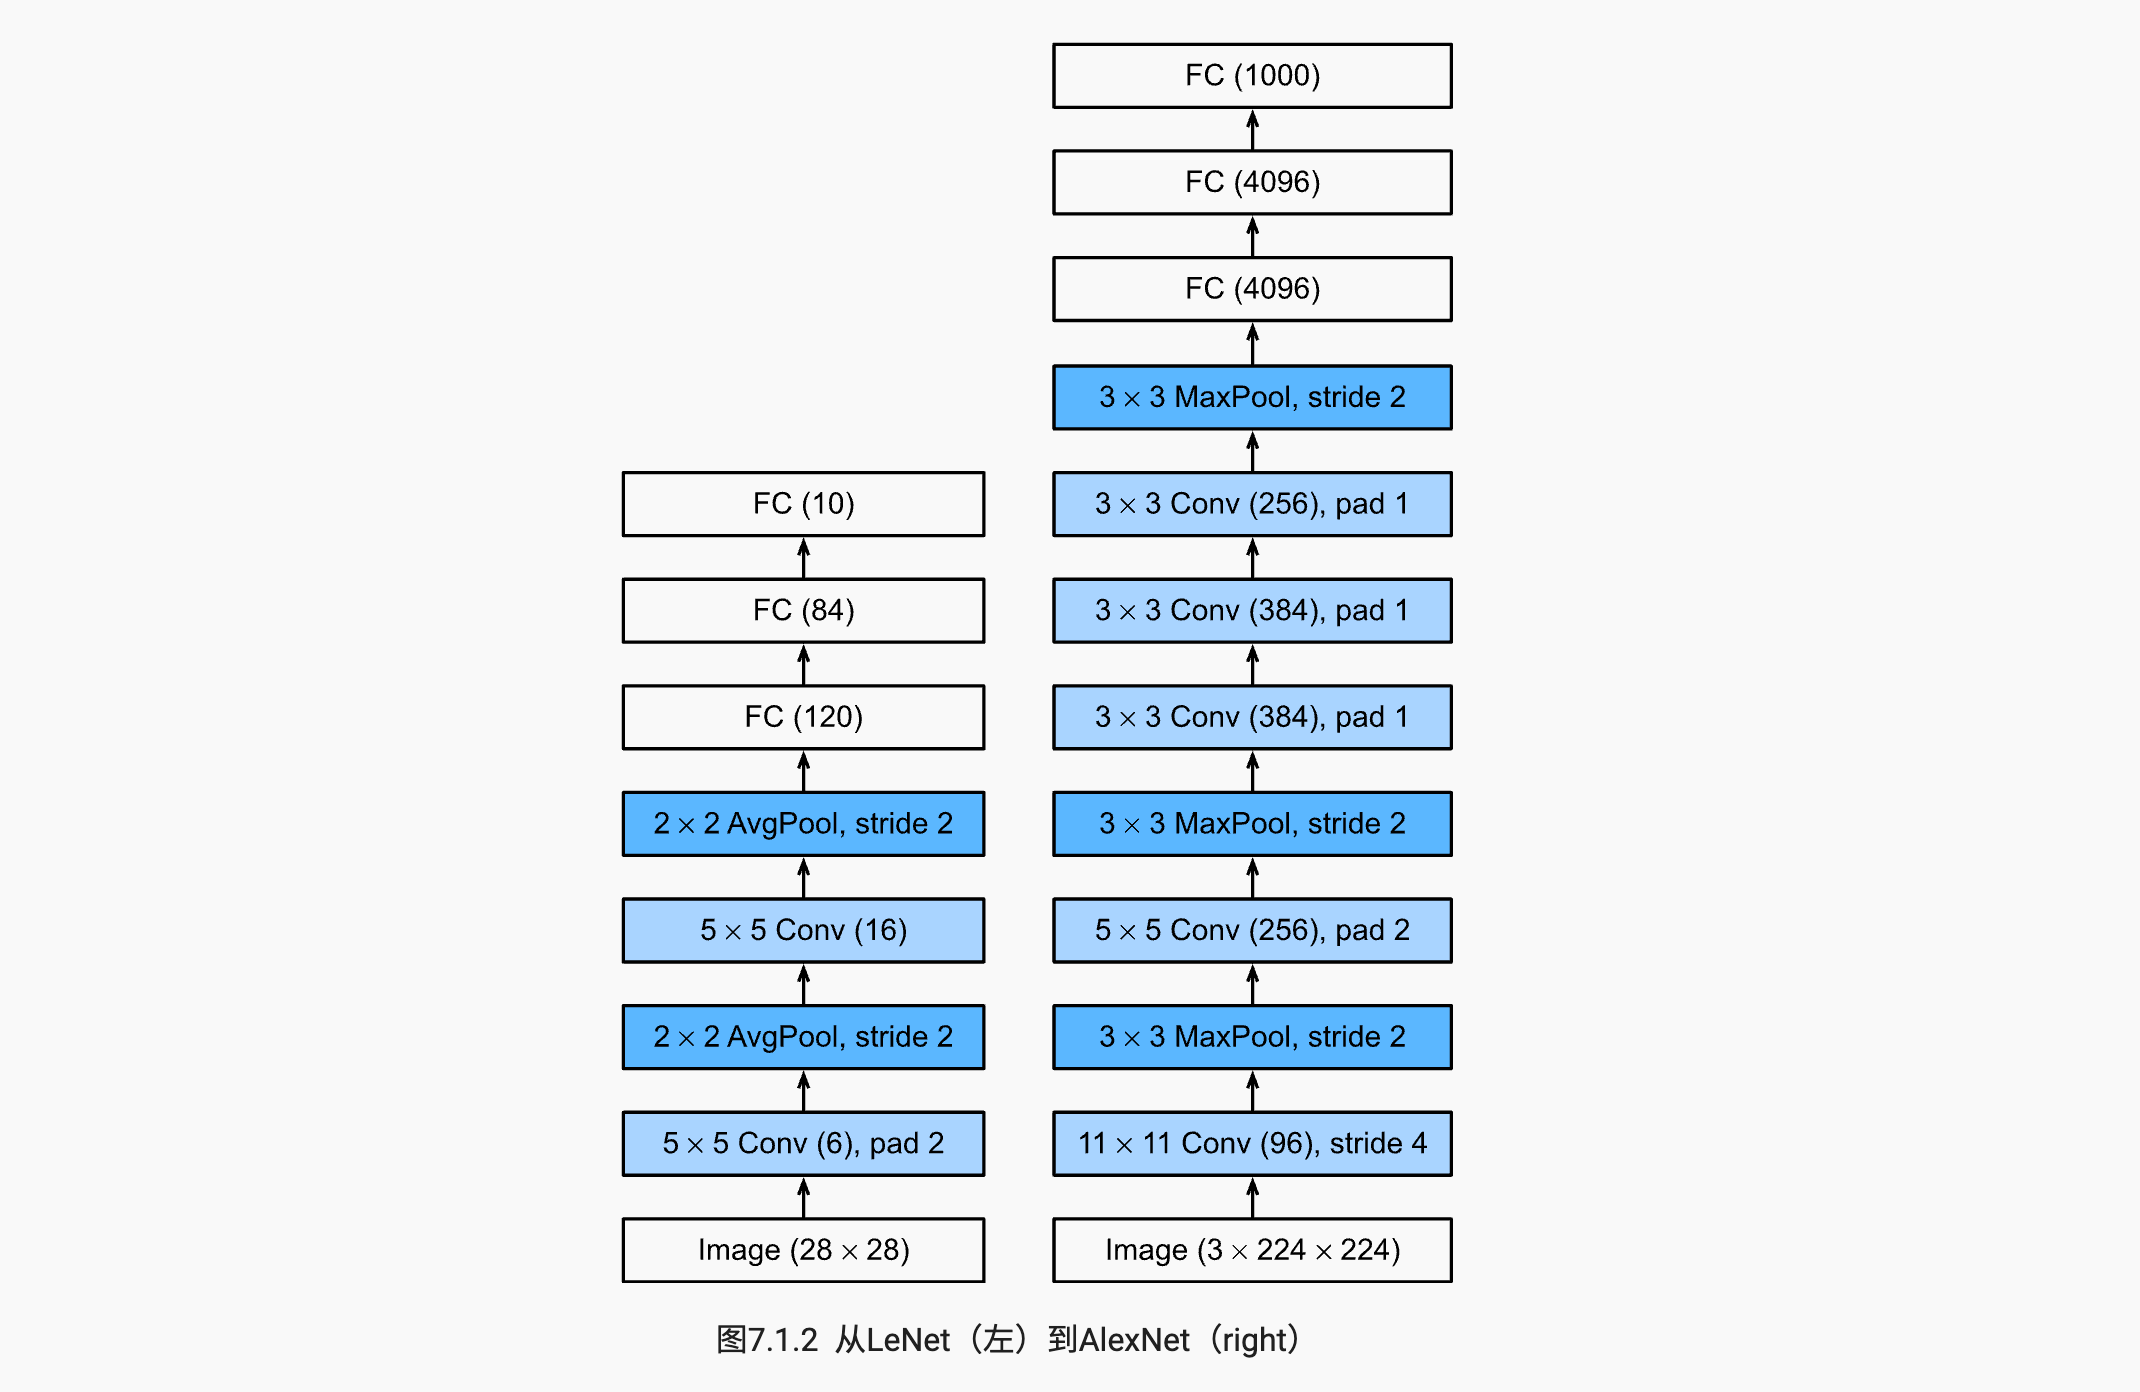
AlexNet和LeNet的设计理念非常相似,但也存在显着差异。 首先,AlexNet比相对较小的LeNet5要深得多。 AlexNet由八层组成:五个卷积层、两个全连接隐藏层和一个全连接输出层。 其次,AlexNet使用ReLU而不是sigmoid作为其激活函数。 下面,让我们深入研究AlexNet的细节。
模型设计
在AlexNet的第一层,卷积窗口的形状是 $11\times11$。 由于ImageNet中大多数图像的宽和高比MNIST图像的多10倍以上,因此,需要一个更大的卷积窗口来捕获目标。 第二层中的卷积窗口形状被缩减为 $5\times5$,然后是 $3\times3$。 此外,在第一层、第二层和第五层卷积层之后,加入窗口形状为 $3\times3$、步幅为2的最大汇聚层。 而且,AlexNet的卷积通道数目是LeNet的10倍。
在最后一个卷积层后有两个全连接层,分别有4096个输出。 这两个巨大的全连接层拥有将近1GB的模型参数。 由于早期GPU显存有限,原版的AlexNet采用了双数据流设计,使得每个GPU只负责存储和计算模型的一半参数。 幸运的是,现在GPU显存相对充裕,所以我们现在很少需要跨GPU分解模型(因此,我们的AlexNet模型在这方面与原始论文稍有不同)。
激活函数
此外,AlexNet将sigmoid激活函数改为更简单的ReLU激活函数。 一方面,ReLU激活函数的计算更简单,它不需要如sigmoid激活函数那般复杂的求幂运算。 另一方面,当使用不同的参数初始化方法时,ReLU激活函数使训练模型更加容易。 当sigmoid激活函数的输出非常接近于0或1时,这些区域的梯度几乎为0,因此反向传播无法继续更新一些模型参数。 相反,ReLU激活函数在正区间的梯度总是1。 因此,如果模型参数没有正确初始化,sigmoid函数可能在正区间内得到几乎为0的梯度,从而使模型无法得到有效的训练。
容量控制和预处理
AlexNet通过dropout控制全连接层的模型复杂度,而LeNet只使用了权重衰减。 为了进一步扩充数据,AlexNet在训练时增加了大量的图像增强数据,如翻转、裁切和变色。 这使得模型更健壮,更大的样本量有效地减少了过拟合。
import torch |
构造一个高度和宽度都为224的单通道数据,来观察每一层输出的形状
X = torch.rand(size=(1, 1, 224, 224), dtype=torch.float32) |
Conv2d output shape:      torch.Size([1, 96, 54, 54])
ReLU output shape:      torch.Size([1, 96, 54, 54])
MaxPool2d output shape:      torch.Size([1, 96, 26, 26])
Conv2d output shape:      torch.Size([1, 256, 26, 26])
ReLU output shape:      torch.Size([1, 256, 26, 26])
MaxPool2d output shape:      torch.Size([1, 256, 12, 12])
Conv2d output shape:      torch.Size([1, 384, 12, 12])
ReLU output shape:      torch.Size([1, 384, 12, 12])
Conv2d output shape:      torch.Size([1, 384, 12, 12])
ReLU output shape:      torch.Size([1, 384, 12, 12])
Conv2d output shape:      torch.Size([1, 256, 12, 12])
ReLU output shape:      torch.Size([1, 256, 12, 12])
MaxPool2d output shape:      torch.Size([1, 256, 5, 5])
Flatten output shape:      torch.Size([1, 6400])
Linear output shape:      torch.Size([1, 4096])
ReLU output shape:      torch.Size([1, 4096])
Dropout output shape:      torch.Size([1, 4096])
Linear output shape:      torch.Size([1, 4096])
ReLU output shape:      torch.Size([1, 4096])
Dropout output shape:      torch.Size([1, 4096])
Linear output shape:      torch.Size([1, 10])


/Users/baikal/miniforge3/envs/pytorch/lib/python3.8/site-packages/torch/nn/functional.py:718: UserWarning: Named tensors and all their associated APIs are an experimental feature and subject to change. Please do not use them for anything important until they are released as stable. (Triggered internally at  ../c10/core/TensorImpl.h:1156.)
  return torch.max_pool2d(input, kernel_size, stride, padding, dilation, ceil_mode)
读取数据集
尽管本文中AlexNet是在ImageNet上进行训练的,但我们在这里使用的是Fashion-MNIST数据集。因为即使在现代GPU上,训练ImageNet模型,同时使其收敛可能需要数小时或数天的时间。 将AlexNet直接应用于Fashion-MNIST的一个问题是,Fashion-MNIST图像的分辨率((28 \times 28)像素)低于ImageNet图像。 为了解决这个问题,我们将它们增加到 (224 \times 224)(通常来讲这不是一个明智的做法,但我们在这里这样做是为了有效使用AlexNet结构)。 我们使用 d2l.load_data_fashion_mnist 函数中的 resize 参数执行此调整。
batch_size = 128 |
/Users/baikal/miniforge3/envs/pytorch/lib/python3.8/site-packages/torchvision/datasets/mnist.py:498: UserWarning: The given NumPy array is not writeable, and PyTorch does not support non-writeable tensors. This means you can write to the underlying (supposedly non-writeable) NumPy array using the tensor. You may want to copy the array to protect its data or make it writeable before converting it to a tensor. This type of warning will be suppressed for the rest of this program. (Triggered internally at  ../torch/csrc/utils/tensor_numpy.cpp:180.)
  return torch.from_numpy(parsed.astype(m[2], copy=False)).view(*s)
lr, num_epochs=0.01, 10 |
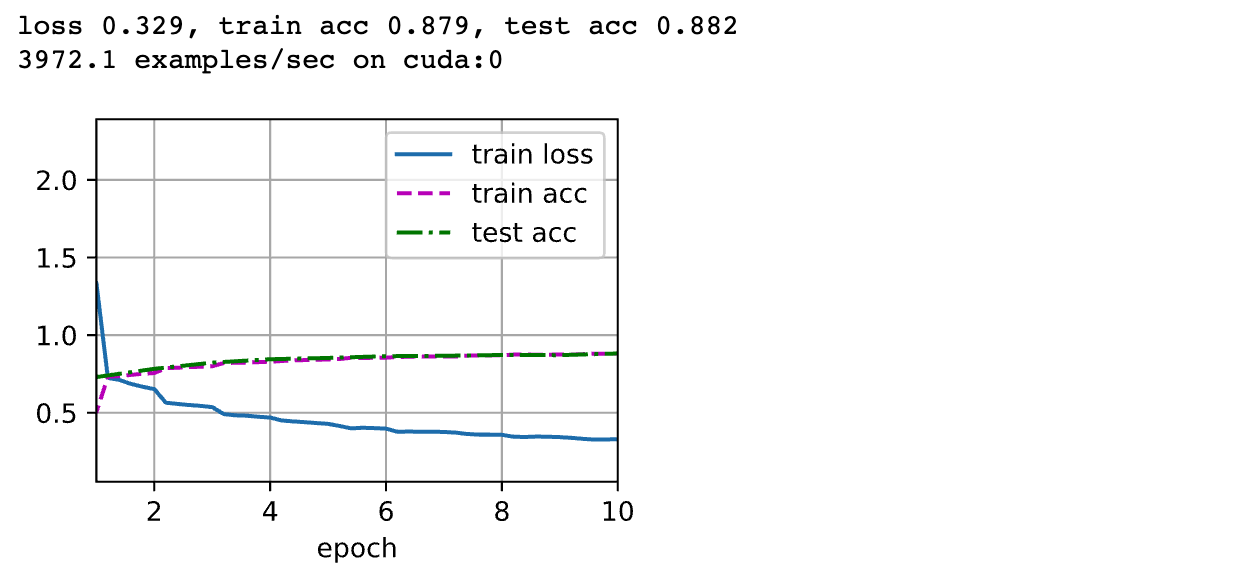
AlexNet的结构与LeNet相似,但使用了更多的卷积层和更多的参数来拟合大规模的ImageNet数据集。
今天,AlexNet已经被更有效的结构所超越,但它是从浅层网络到深层网络的关键一步。
尽管AlexNet的代码只比LeNet多出几行,但学术界花了很多年才接受深度学习这一概念,并应用其出色的实验结果。这也是由于缺乏有效的计算工具。
Dropout、ReLU和预处理是提升计算机视觉任务性能的其他关键步骤。